How to Wiki
Welcome to EUSWiki, a MediaWiki hosted wikipedia page. All and any help you may need can be found here, but I will try and provide the mere basics here for text editing, understanding the layout, and more.
Contents
Known Bugs
- Sometimes line breaks are not consistent. Insert
<br>to remedy this
Users
Right now only users registered by Wiki Curator can create and edit pages. This is in an effort to moderate the articles created and streamline information. If you would like an account, or know someone who would, email wiki.meta@mcgilleus.ca
Text Editing
For those of you who may know HTML5, woo-hoo! This is similar to that, but not quite. There's a whole host of different syntax, but the same logic applies.
You can format your text by using wiki markup. This consists of normal characters like asterisks, apostrophes or equal signs which have a special function in the wiki, sometimes depending on their position. For example, to format a word in italic, you include it in two pairs of apostrophes like ''this''.
| Description | Youtype | You get |
|---|---|---|
| Character (inline) formatting – applies anywhere | ||
| Italic text | ''italic'' |
italic |
| Bold Text | '''Bold''' |
bold |
|
Bold and italic |
''' ''bold & italic'' ''' |
bold & italic |
|
|
<strike>strike text</strike> |
|
| Escape wiki markup | <nowiki>no markup</nowiki> |
no ''markup'' |
Section Formatting | ||
| Headings of different levels | == Test 2 == === Test 3 ===
|
Test 2Test 3 |
| Horizontal Line | Text before ---- Text after |
Text before Text after |
|
Bullet list |
* Start each line |
Any other start ends the list. |
| Numbered list |
# Start each line # with a Numbersign/Hashtag (#). ## More number signs give deeper ### and deeper ### levels. # Line breaks <br />don't break levels. ### But jumping levels creates empty space. # Blank lines # end the list and start another. Any other start also ends the list. |
Any other start also ends the list. </translate> |
| Indent text |
:Single indent |
:Single indent
|
Adding Colors
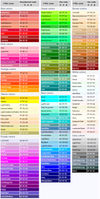
Mediawiki supports a host of vernacular terms to colorize content without needing to know the hexadecimal values. So, when using 'style', insert one of the names to the right instead of the actual color value. It saves the trouble of remembering those pesky alphanumeric values, and spreads consistency.
Templates
Because a lot of wikipedia formatting becomes redundant, templates are heavily relied upon to add the same information without having to copy and paste.
Take for example, a simple notice that the page is not currently complete:
Template:Incomplete
The code desired to be recreated was made into a new page on the wiki named Template:Incomplete. Then, once saved, the template can be called upon using double curly brackets around the name of the template, i.e. {{Incomplete}} . As long as the code is created in a document labeled 'Template:XXXXX', it can then be called upon again.
For more information on importing templates used on Wikipedia for example, navigate to Infoboxes#Export/Import
Categories
To add a category, you can insert the following tag at the very end of the article:
           [[category:**********]]
                         Where ****** is your desired category.
In order to make nested categories, you simply need to replicate the tag. Say I want to categorize Countries with a subcategory England with a subcategory London:
[[category:Countries]] [[category:England]] [[category:London]]
Infoboxes
Infoboxes are the iconic boxes that can be seen on the top right of nearly every wikipedia page. To learn more about infoboxes, please go here.
Tabs
Tabs is an extension that provides a handy way to create multiple tabs and tables. This is very useful for containing nested information, and can be manipulated depending on your understanding of the mechanism. To learn more about Tabs, click here.
What you enter
- <tabs>
- <tab name="Tab 1">This is a test</tab>
- <tab name="Tab 2", index="2">This is also a test</tab>
- <tab name="Tab 1">This is a test</tab>
- </tabs>
What you Get
Nested Tabs
Nested Tabs are useful for having large amounts of information without overburdening the layout or flow of your article.
The syntax is essentially the same as above
<tab name="Open me!" collapsed> Contents </tob>
PDFs
Many bylaws, policies, agendas, etc. come in the beautiful electronic format PDF. Better yet, you can slyly embed a PDF into a tab such that it's expandable, while not taking up too much space (Note: if you wish to place a pdf without the expandable option, negate the tab ends). To do so, implement the aforementioned "Tag" syntax:
<tab name="I've eaten a PDF" collapsed></tab>Inside of the Tab you can place a pdf using the following syntax:
<pdf>File:Libraryofbabel1.pdf</pdf>Put the two together
<tab name="I've eaten a PDF" collapsed><pdf>File:Libraryofbabel1.pdf</pdf></tab>Font Awesome
A well known bootstrap based icon pack, FontAwesome is a very easy way to include icons without having to import anything. They're flexible in terms of resizing, color, and placement, and varied enough that you're sure to find the icon you're looking for. To see a complete list of compatible icons, navigate to our FontAwesome wiki page, which includes how to embed and a few examples.
